How to Create User-Defined Routes in Azure with PowerShell
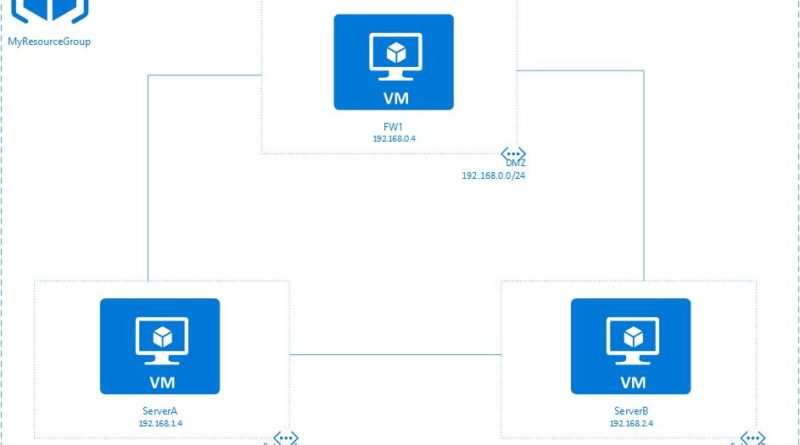
Prior to the implementation of UDRs, traffic bound for ServerB from ServerA flowed directly from ServerA to ServerB via the default system routes in place in Azure. Nothing fancy. However, our imaginary CIO wanted me to route this traffic through the FW1 device so the traffic travelling between Subnets A and B could be inspected for one reason or another.
To satisfy this requirement, I provisioned a couple Route Tables (as they are called in Azure) and a couple of User-Defined Routes (UDRs). After configuring these resources in Azure, I assigned them to their appropriate subnets so all traffic between ServerA and ServerB was routed through FW1.
This is how I did it…
Prior to making any changes, I performed a tracert from each subnet to the other to make sure traffic was flowing directly between the subnets. I would compare this data to the tracert I ran AFTER making the changes.
Configuring the Route to SubnetB
After confirming traffic flow, I logged into Azure from PowerShell and provisioned my first route (called RouteToSubnetB) by running the PowerShell command below.
$route = New-AzureRmRouteConfig -Name RouteToSubnetB -AddressPrefix 192.168.2.0/24 -NextHopType VirtualAppliance -NextHopIpAddress 192.168.0.4
What the PowerShell command above did was take the result of the New_AzureRmRouteConfig command and store it in the $route variable.
The breakdown of the command is as follows:
- -Name: The name of the route that I provisioned
- -AddressPrefix: The address prefix of the destination subnet
- -NextHopType: Specifies the type of device we are routing our redirected traffic through
- -NextHopIPAddress: The IP address of our pretend firewall
Configuring the SubnetA to SubnetB Route Table:
Click here to join the Understanding Azure Facebook group or here for the latest Azure practice questions, answers, explanations, and reference materials.