How to Deploy a Virtual Machine in Azure with PowerShell
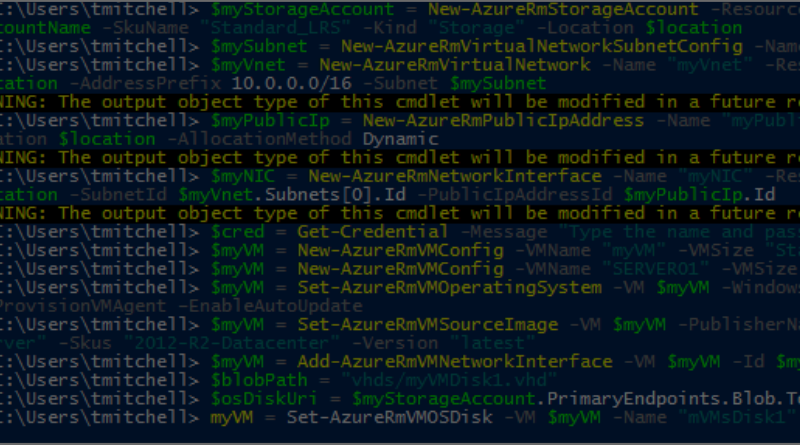
$myVM = Set-AzureRmVMOperatingSystem -VM $myVM -Windows -ComputerName "SERVER01" -Credential $cred -ProvisionVMAgent –EnableAutoUpdate
Be sure to run the above command all on one line (no line breaks). As is the case with other commands, you’ll simply be returned to the prompt when it completes.
At this point, you can define the image you’d like to use to provision the virtual machine. Run the following command to deploy a Windows 2012 R2 Datacenter machine:
$myVM = Set-AzureRmVMSourceImage -VM $myVM -PublisherName "MicrosoftWindowsServer" -Offer "WindowsServer" -Skus "2012-R2-Datacenter" -Version "latest"
Now that the image is selected, go ahead and add the network interface that you provisioned earlier:
$myVM = Add-AzureRmVMNetworkInterface -VM $myVM -Id $myNIC.Id
Once you have the network interface added to your virtual machine, you can define the name and location of the hard disk for the VM. For this exercise, we will call our disk myVMDisk1.vhd.
To complete this task, run the following two commands, hitting Enter after each one:
$blobPath = "vhds/myVMDisk1.vhd"
$osDiskUri = $myStorageAccount.PrimaryEndpoints.Blob.ToString() + $blobPath
With the disk name and location defined, you can add the disk to your virtual machine configuration. The following command (all one line) will create a disk called myVMDisk1:
$myVM = Set-AzureRmVMOSDisk -VM $myVM -Name "mVMsDisk1" -VhdUri $osDiskUri -CreateOption fromImage
You can now create the actual virtual machine using the following command:
New-AzureRmVM -ResourceGroupName $myResourceGroup -Location $location -VM $myVM
To confirm creating of your new virtual machine, login to your Azure Portal and ensure it is listed under your resource group called myAzureResourceGroup.
Click here to join the Understanding Azure Facebook group or here for the latest Azure practice questions, answers, explanations, and reference materials.