How to Resize an Azure Virtual Machine via PowerShell
 If you’ve been a systems administrator long enough, you already know that there will be times when an application outgrows the server hosting it. In the case of a physical server, you would typically add a physical CPU, additional RAM, or more disk to accommodate the requirements of an application that has outgrown the server. However, in the case of an application outgrowing an Azure virtual machine, you can use PowerShell to resize the virtual machine so that it can support the increased demands of the application that it hosts.
In this tutorial, we are going to resize a virtual machine, named myVM. If you’d like to follow along in your own Azure tenant, create a resource group called VMLab and deploy a Windows virtual machine, called myVM, in it. When deploying the virtual machine, make sure you choose the Standard_DS1_V1 size.
Not sure how to deploy resources to Azure? Click here.
Retrieve Available Sizes
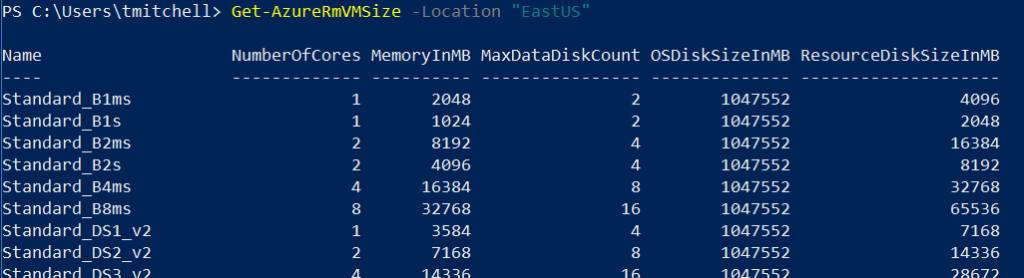
Before attempting to resize our virtual machine, we need to retrieve a list of virtual machine sizes that are available in the EastUS region, which is where the myVM virtual machine resides. We need to do this because if the VM size that we want to change our virtual machine to is not available in the region hosting our existing virtual machine, we aren’t going to be able to change to that size.
EDITOR'S NOTE: This tutorial was excerpted from the complete online video course, "Creating and Managing Azure Virtual Machines with PowerShell", which can be found on the Udemy training platform.
Using the commands outlined throughout the rest of this tutorial, we are going to attempt to resize the myVM virtual machine from Standard_DS1_V1 to Standard_DS2_V2. As such, we need to ensure that the Standard_DS2_V2 size is available.
To confirm that Standard_DS2_V2 is available in the East US region, run the following command from PowerShell:
Get-AzureRmVMSize -Location "EastUS"
The Get-AzureRmVmSize command, when run with just the “Location” switch, will return all sizes available in the specified location. Confirm that Standard DS2_V2 is available. If it’s not, find another size that is available.
After confirming that Standard_DS2_V2 is available in the EastUS region, you also need to make sure that it’s available on the current cluster, where the MyVM virtual machine resides. To do so, use the same Get-AzureRmVMSize command as before – just with a few different switches.
To confirm that the Standard DS2_V2 size (or your chosen size) is available on the cluster where MyVM resides, run the command below:
Get-AzureRmVMSize -ResourceGroupName "VMLab" -VMName "myVM"
By specifying the -VMName and -ResourceGroupName switches in the command above, you can confirm that the Standard_DS2_V2 size is available on the same cluster as the virtual machine. If so, the virtual machine can be resized from a powered-on state (without the need to deallocate it). However, it will still require a reboot during the operation.
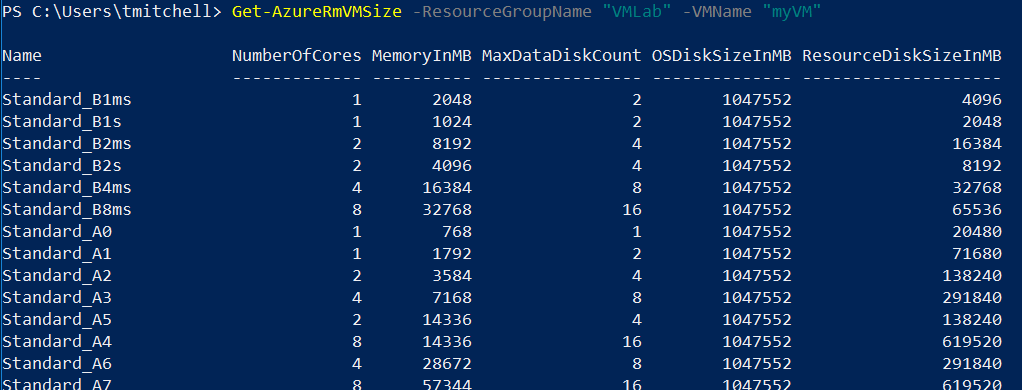
If the Standard_DS2_V2 size is NOT available on the virtual machine’s current cluster, the virtual machine needs to first be deallocated before the resize operation can occur. In such a case, any data on the temp disk is removed and the public IP address will change (unless a static IP address is being used).
Resize the Virtual Machine
To resize the virtual machine (MyVM), you need to run a few different PowerShell commands.
The first command essentially loads the configuration profile of the virtual machine into a variable called $vm. The second command will modify the -VMSize attribute stored in that variable to reflect the new virtual machine size. The third command, called Update-AzureRmVM, will take the updated configuration that is stored in the $vm variable and write it to the virtual machine.
To begin the resize process of the MyVM virtual machine, run the command below from a PowerShell session that’s connected to your Azure tenant:
$vm = Get-AzureRmVM -ResourceGroupName "VMLab" -VMName "myVM"
The command above retrieves the current virtual machine configuration and stores it in the $vm variable.
To modify the size attribute for the virtual machine, run the command below:
$vm.HardwareProfile.VmSize = "Standard_DS2_V2"
The command above changes the “size” attribute of the myVM virtual machine that’s stored in the variable to Standard_DS2_V2.
Once the new size has been specified using the command above, run the command below to update the virtual machine with the new configuration:
Update-AzureRmVM -VM $vm -ResourceGroupName "VMLab"
The “-VM” switch specifies which VM configuration to update. In this case, the configuration being updated is the one we stored in the variable earlier. After executing the Update-AzureRmVM command above, the MyVM virtual machine is updated and then automatically restarted.

The process takes a few minutes to complete, but when it completes, the myVM virtual machine is resized to reflect the new size.
More Learning Resources
If you’d like to learn more about topics like this one, visit me at my website or at my training site. You can also find me on LinkedIn and on Facebook. If you are after free video tutorials, visit my YouTube channel. Some of my courses, like this one, can also be found on Udemy.com, where you can use coupon code THOMASMITCHELL at checkout to get any one of my complete online courses for just $12.99.
Click here to join the Understanding Azure Facebook group or here for the latest Azure practice questions, answers, explanations, and reference materials.