Creating and Importing Encryption Keys with Azure Key Vault

When it comes to security, you can never be “too secure”. When it comes to cryptographic keys that are used and accessed by your cloud-based applications, it’s crucial that they are properly protected.
Enter the Azure Key Vault.
The Key Vault is an Azure offering that is designed to protect cryptographic keys that are used by cloud applications and services. Using the Azure Key Vault, admins can protect and encrypt such items as .PFX files, data encryption keys, storage account keys, and even passwords.
Streamlining the key management process is the primary function of the Key Vault, allowing administrators to manage control of keys that are used to access and encrypt data. Resource owners and even developers can create specific keys that provide access to applications and even development environments within minutes. Revocation of that access to can be accomplished just as quickly revoking permissions to these keys.
In this tutorial, we’ll work through the process of using Azure Key Vault to generate a new software-protected key, using PowerShell. We’ll also work through the process of importing a PFX file into the Azure Key Vault.
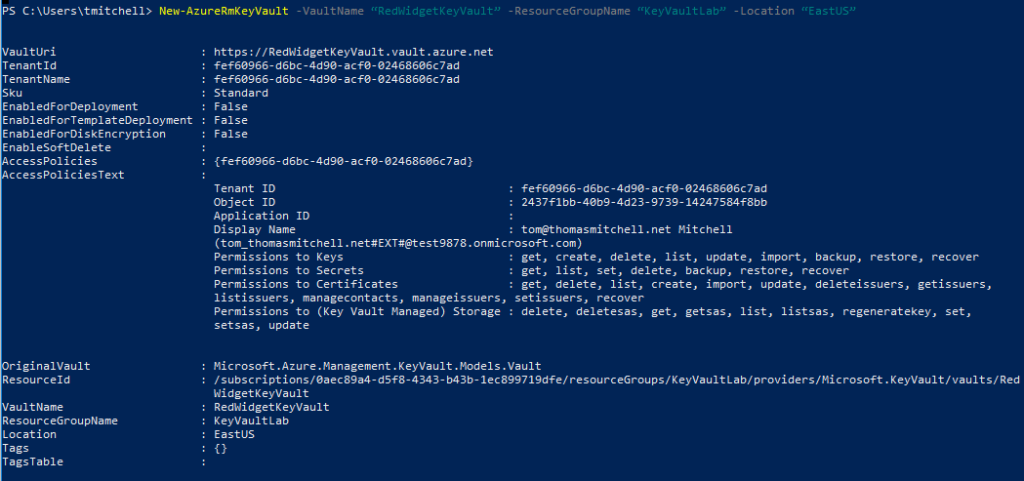
If you’d like to follow along in your own environment, run the commands below to create a resource group called “KeyVaultLab” and a Key Vault called “MyKeyVault”:
New-AzureRmResourceGroup -Name KeyVaultLab -Location EastUS
New-AzureRmKeyVault -VaultName “RedWidgetKeyVault” -ResourceGroupName “KeyVaultLab” -Location “EastUS”
Once you have the new resource group and key vault created, continue with the tutorial.
Adding a New Software-Protected Key to the Key Vault
Creation of a new software-protected key in the Azure Key Vault is completed with the Add-AzureKeyVaultKey cmdlet. This rather simple command only requires a few switches when creating a new key and storing it in the key vault.
To create a new key in the Key Vault, simply connect to the Azure tenant via PowerShell and run the Add-AzureKeyVaultKey command. When running the command, specify the name of the vault with the “-VaultName” switch. Additionally, specify the name of the key being created by using the “-Name” switch. Use the “-Destination” switch to specify what kind of key to create. Specifying “software” creates a software-protected key, while “HSM” creates an HSM-protected key.
The command below creates a software-protected key, named “MyFirstKey” and stores it in the Key Vault named “MyKeyVault.”
$key = Add-AzureKeyVaultKey -VaultName 'RedWidgetKeyVault' -Name 'MyFirstKey' -Destination 'Software'
Viewing the URI for the newly-created key is as simple as calling the variable, along with specifying the ID stored in the variable. Typing the following info below into PowerShell retrieves the URI for the new key:
$key.id
As shown in the screenshot, typing $key.id returns the URI of the new key.

This URI is significant because keys created or uploaded to the Azure Key Vault are referenced by URIs.
Importing an Existing Software-Protected Key into Azure Key Vault
Now that we’ve covered the creation and storage of a new key in the Azure Key Vault, let’s work through the process of importing an existing key as well. The process is pretty straightforward, and not terribly complex. The Add-AzureKeyVaultKey command is the command that we’ll use to complete the process of importing a software-protected key into the vault.
I have, on my workstation, a software-protected key, called “swkey.pfx”, that’s stored in my “C:\Keys” folder. This is a previously exported key and it’s protected with an access password of “A123456z!” Uploading this key to the Key Vault in Azure requires that I first store its access password in a variable, using the ConvertTo-SecureString command. Doing so will allow the me to pass this password to the import process when importing the key into the vault.
As you can see on the screenshot here, I’m converting the exported key’s password to a secure string and storing it in a variable, called securepfxpwd.
$securepfxpwd = ConvertTo-SecureString –String 'A123456z!' –AsPlainText –Force
Running the command above stores the password in the securepfxpwd variable, which will be referenced when we run the Add-AzureKeyVaultKey command, next.
Importing a software-protected key into the Key Vault with the Add-AzureKeyVaultKey command requires a few switches (KeyFilePath and KeyFilePassword). The “-VaultName” and “-Name” switches are also necessary. The KeyFilePath switch specifies the path to the PFX file that is being imported. The KeyFilePassword switch specifies the secure password for the PFX file that was stored in the securepfxpassword variable earlier.
Running the command below imports the swkey.pfx key into the key vault, and names it “MyImportedPFX”. The vault into which the key is being imported is called “MyKeyVault”. The KeyFilePath switch tells the Add-AzureKeyVaultKey where to find the PFX file and the KeyFilePassword supplies the access password for accessing the PFX file.
$key = Add-AzureKeyVaultKey -VaultName 'RedWidgetKeyVault' -Name 'MyImportedPFX' -KeyFilePath 'c:\keys\swkey.pfx' -KeyFilePassword $securepfxpwd
After the import completes, the URI for this imported key can be retrieved by typing $key.id at the PowerShell prompt:
$Key.id

To view the actual key, use the Get-AzurekeyVaultKey command:
Get-AzureKeyVaultKey –VaultName “RedWidgetKeyVault” -KeyName “MyImportedPFX”
The screenshot below shows what information is returned.

With that, you now know how to create a new key in the Azure Key Vault and you also know how to import an existing key into the vault.
More Learning Resources
If you’d like to learn more about topics like this one, visit me at my website or at my training site. You can also find me on LinkedIn and on Facebook. If you are after free video tutorials, visit my YouTube channel. Some of my courses, like this one, can also be found on Udemy.com, where you can use coupon code THOMASMITCHELL at checkout to get any one of my complete online courses for just $12.99.
Thanks for reading and happy learning!
Click here to join the Understanding Azure Facebook group or here for the latest Azure practice questions, answers, explanations, and reference materials.