How to Create User-Defined Routes in Azure with PowerShell
To finish the configuration of my SubnetA-related stuff, I ran the following command to save my settings to Azure:
Set-AzureRmVirtualNetwork -VirtualNetwork $vnet
Now that everything was configured on the SubnetA side of things, I had to go in and repeat the process for the SubnetB side. Instead of explaining the same thing all over again, I’ll give you the “short” version below:
Configuring the Route to SubnetA
$route = New-AzureRmRouteConfig -Name RouteToSubnetA -AddressPrefix 192.168.1.0/24 -NextHopType VirtualAppliance -NextHopIpAddress 192.168.0.4
Configuring the SubnetB to SubnetA Route Table:
$routeTable = New-AzureRmRouteTable -ResourceGroupName MyResourceGroup -Location westus -Name SubnetB-SubnetA -Route $route
Assigning my New Resources
$vnet = Get-AzureRmVirtualNetwork -ResourceGroupName MyResourceGroup -Name VNetwork
Set-AzureRmVirtualNetworkSubnetConfig -VirtualNetwork $vnet -Name SubnetB -AddressPrefix 192.168.2.0/24 -RouteTable $routeTable
Saving the Configuration for SubnetB Stuff
Set-AzureRmVirtualNetwork -VirtualNetwork $vnet
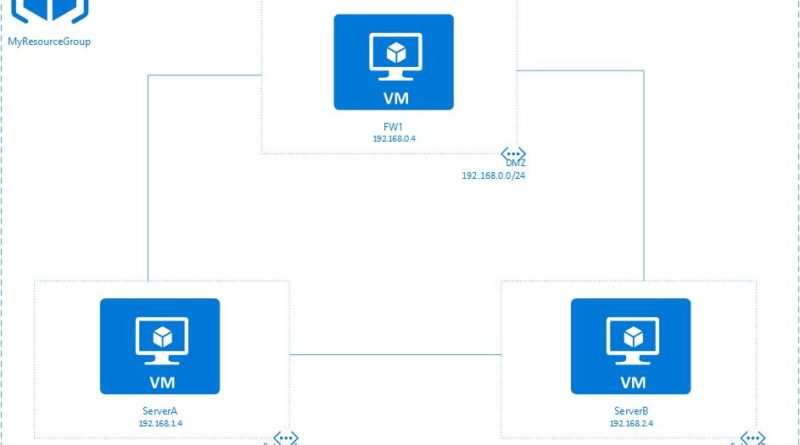
At this point, I had the following resources deployed:
- Routes: RouteToSubnetB, RouteToSubnetA
- Route Tables: SubnetA-SubnetB, SubnetB-SubnetA
To confirm my configuration, I logged into ServerA and performed a tracert to ServerB. Instead of routing directly to ServerB, tracert took me to FW1 first, and then to ServerB:
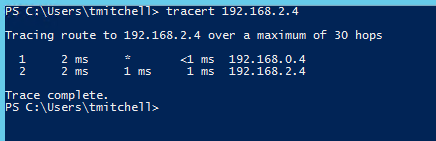
I then performed the same exercise from ServerB to ServerA:
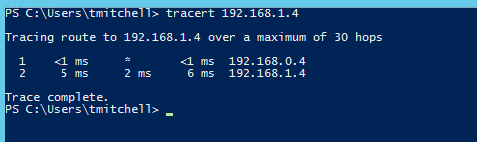
As you can see from the screenshots here, traffic between SubnetA and SubnetB is now routed through the FW1 server. The User-Defined Routes and Routing Tables functioned as expected!
Although I performed this exercise using PowerShell, User-Defined Routes can also be configured using the Azure Resource Manager - but I'll save that for another post!
Click here to join the Understanding Azure Facebook group or here for the latest Azure practice questions, answers, explanations, and reference materials.